

 A pre-compiled server executable is available from google code (1008 kB), built from current trunk version.
edit 2013-08-30: the zip has now been replaced by a proper installer
Below is a quick start guide to playing with that server, I hope to later find time for more complete guide up to setting up a complete “production server”.
Pre-requirements
Besides the zip, you’ll need a Windows machine running at least Windows 2008 or Vista, and you’ll need to have administrator rights to that machine.
By default the test server opens up port 888, so that port as to be free, you can also configure that port to another value in the server options.
Download the zip, unzip it anywhere outside “program files”, preferably on a path near the root of a volume (cuts down on the typing when/if you configure the paths). For the rest of the guide, we’ll assume you unzipped it to “D:\DWSWebServer”.
Starting as application
The executable can work both as a service and as an application. Application mode is convenient for testing, and is also what you’ll be using when starting the server from the Delphi IDE for debugging purposes.
To start as an application, right-click the executable and “run as administrator”, you should see something like:
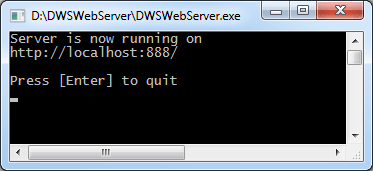
The server is now running, and you can point your favorite browser to http://localhost:888/ to access the sample/test website that came in the zip. The sample website is fairly limited and simple, but should be easy to understand and simple to modify. If you like seeing less static things, click “system information” or “SQLite Test” links.
When you’re done, press enter in the DWSWebServer window or close it.
Setting up to start as an application without administrator rights
If you don’t have administrative rights, this is what you’ll need to do to start the server as an application “normally” or for debugging purposes what starting the server from the Delphi IDE.
There are many ways to do that. If you plan to automate that part in your deployments, you should read this article about HTTP server tasks. Otherwise, one simpler way is to just get HttpSysManager (and read the demystifying article), it’ll also come in handy if you want to setup SSL.
Assuming you’ll stick to taking over the 888 port for DWSWebServer, in HttpSysManager, go to the “Acls” tab, then add a new ACL for “http://+:888/”, then give the permissions “Register” and “Delegate” to the user(s) that will be allowed to start a server on port 888.
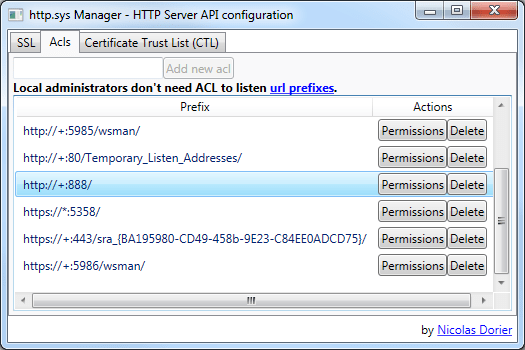
The URL ACL syntax in Windows might be familiar if you already setup an IIS or WCF server, if not see this technet article (this article isn’t very clear, if you find a better one let me know).
Basically the URL ACL syntax allows for wildcard-based filtering of URL, and when http.sys receives a request, it will go through its filters and direct the request to the appropriate service.
This mechanism allows to have completely different services accessible on the same http port, for instance you could have on the same machine:
- http://www.mydomain.com/web/ be handled by IIS and its ISAPI DLLs
- http://www.mydomain.com/cool/ be handled by DWSWebServer
- http://www.mydomain.com/corporate/ be handled by some WCF services
And each of the services would get the request forwarded to it in the most straightforward (and efficient) fashion allowed by the http.sys driver. This is a significant step up from old-fashioned ISAPI and web server extensions, where all requests had to go through IIS, and had to live within the IIS server process.
Besides performance, this also means security, as processes are isolated from each others unlike ISAPI DLLs or (spawned) CGI, each http.sys consumer really lives in its own process with its own credentials.
Setting up as a service
 Start a command line as administrator and navigate to “D:\DWSWebServer” (or wherever you unzipped), and then execute “DWSWebServer /install”, the service will now be installed. Alternatively, you can also place that command in a .cmd file and execute it as administrator (several ready-to-use cmd files are included in the installer).
Other supported command line parameters are /uninstall (uninstalls the service), /start and /stop (to start and stop the service). Just execute “DWSWebServer /?” to get a list.
If you go to the services console (services.msc from the windows command line), you’ll now see the new “DWScript WebServer” server, you now can start it, stop it, etc. as a usual service.
Note that the name and description of the service can be adjusted in service options, which allows installing the service multiple times, with multiple sets of options, on the same server.
Services don’t absolutely require setting up an URL ACL (since you have to be administrator to install the service, on the fly registration is allowed), though you may still want to setup one anyway if you’re going to share a port, as the URL ACL list in HttpSysManager can give a better overview of all that going on.
Initially the service will have installed to run under the “System” pseudo-account, you may want to run it as as named user instead (in which case setting up an URL ACL is required). Using a named account will give you finer administrative control over the rights and permissions of the service.
To be continued
We’ll go through configuring server options in the next part…


downloading now…
Nice tutorial, DWS = Delphi Web Script, Is Web Scripting use Delphi Language…….
Eric, thanks for the first part, wait for a second!